7.27.2015

Just a few more photos of "Sophisticated Ladies" from Zach Theatre in Austin, Texas.

Jennifer Halliday on the Topfer Stage at Zach Theatre in Austin, Texas

I really enjoy photographing live theater. The stages and performances are usually beautifully lit by premier lighting designer, Michelle Habeck and that's such an important part of the success of the photos. Then there is the hard work of set designing which was done in Sophisticated Ladies by J. Aaron Bell. I have to credit the action/choreography to Dominique Kelley and the costume design to Susan Branch Towne. Takes a real collaboration to make this all work well for the photographer. And, of course, for the audience. 

There are so many other people involved but these are the ones that make the visual stuff shine and that's the biggest help when it comes to getting good photographs for publicity.

I shot these images with the Nikon D810 and the older, push/pull version of the 80-200mm f2.8 D lens. I've pixel dived down to 100% and I must say that not only is the D810 an impressive performer but so is the ancient lens I've put on the front of the camera. 

If you live in Austin and love live theater this play/musical is another one to love.


7.26.2015

untitled. Location: Graffiti Wall. Austin, Texas.


A random visual observation from the Hope Outdoor Gallery a few months ago. Love the catchlights in the eyes...

Sky and tree. The Sigma 50mm Art lens + the Nikon D610. My review of a camera body that's nearly discontinued.


When I first got interested in photography, back in college, the choice of cameras didn't seem nearly as extensive as it does now. I don't mean that there were fewer brands or fewer models to choose from but that for every serious beginning photographer no  matter which brand you decided on you were +98% likely to choose a model that used 35mm film. Leica M, Canon G17, Nikon F2, Canon F1, Olympus OM-1, even the old Pentax Spotmatic were all using the same, spooled, 35mm film and creating negatives and slides that were 24 by 36mm in size.

To be sure, there were outliers who were using medium format cameras and a few precocious beginners who went straight to the large format cameras, but a walk across campus or a stroll through town would quickly convince you that almost the entire world was working in the same basic format size. There was also no such thing as the 18 month product cycle with most of the SLR cameras. Nikon updated their professional camera body about once every ten years which generally created an even stronger demand for their previous models. Canon extended their line with more gusto but even they were measured when it came to changing their flagship product.

The uniformity of format even extended to the most basic point and shoot cameras. The Olympus Trip35s and later, the Stylus cameras, tiny though they were, still took the familiar 35mm rolls of Fuji, Agfa and Kodak film. Another commonality was the fact that the focal lengths of the lenses had the same "meaning" across all lines of 35mm cameras. A 105 mm on a big, pro camera had exactly the same angle of view as the 105 mm setting on the zoom on the lowliest point and shoot.

I owned a number of different 35mm camera bodies from Nikon, Canon, Leica and Contax. The common thread between most of them was the uniformity of construction and operation. The bodies were all built from solid metal, had a certain heft in your hand and all worked in much the same fashion. From a quality point of view all of the top cameras from the top brands were equally capable but just as today there were rabid fans of the optics from each brand.

It is against this background that I select and embrace the cameras that I use in the business. I am used to the DSLR form factor since it is the direct descendant of the many cameras I have used over the years in the SLR form factor. While I keep pushing and pulling and stretching the various mirrorless cameras with their addictive EVFs I seem to have come full circle to re-embrace the capabilities of the traditional cameras. (Note: I have not sold or given away the Olympus EM5.2 cameras and use them extensively for my personal work!). The primary reason for me to use the full frame Nikon cameras that I do use is for the quality of their sensors and the more rapid retreat of focus with fast lenses.  The newest Sony sensors are visibly better than previous generations, and also better at the ISOs that I am used to using when compared to the Canon

7.24.2015

My Book on LED Lighting. Published by Amherst Media. Enjoyed by photographers and videographers everywhere. Kindle or Paper.

Jana shows off her cover portrait on Guadalupe St. in Austin, Texas


Austin Summer. The remnants of good tacos. The bounty of the chili con queso bowl. And lots of hypnotic blue below.

©2014 Kirk Tuck


While I don't have a Zeiss Otus 50mm lens I'm going to bet that the 50mm f1.4 Sigma Art Lens will give it a good run for first place in the pantheon of lenses.

©2015 Kirk Tuck. The Blanton Museum.

©2015 Kirk Tuck. The Blanton Museum.

Both images above: Sigma 50mm Art lens.

Both Lloyd Chambers and Ming Thein have been known to gush about the Zeiss Otus 50mm lens from time to time, and I have no doubt that it is a magnificent lens optically. Especially in the hands of a very careful worker who spends most of his time carefully making photographs with his camera on a stout tripod and with the mirror firmly locked up. But I'll venture to say that most people would be able to get within 5% of its capabilities, in the normal world, with the breathtakingly good (especially for the $$$) Sigma 50mm f1.4 Art lens. While the Zeiss might have a small advantage in terms of potential image quality the Sigma has it all over the Zeiss Otus when it comes to handling and general, daily use. Why? Well, the biggest thing is the fact that the Sigma is an autofocus camera in an age of autofocus cameras while the Otus depends on the mediocre focusing screens of the same cameras to achieve its highest levels of performance. 

I get where they are coming from. We'd all the like the confidence boost of shooting with a known ultimate optic. If I had money to burn you know I'd have one right now and I'd be figuring out how to write future blog posts rationalizing both the cost and my passion for the Otus. But I know how these things work out for me and for most other photographers. We reason, during research and shopping period, that we'll be disciplined enough to always whip out that carbon fiber+titanium tripod for every single shot. We'll convince ourselves (after a good amount of frustration trying to focus through the optical finder) that we need to buy a Zacuto Loupe for the back screen of our Nikon D810 or Canon 5Dr so we can fine focus at high magnifications in live view. At this point we'll start passing on shooting living people because so few will put up with the plodding routine of the photographer getting ready to push the shutter button. Eventually we'll start cheating and come to depend on the green "focus confirmation" light in the finder and  then we'll get so frustrated by the vast number of front and back focused images we get when trying to use the lens wide open that we'll eventually just start shooting the darn thing at f5.6 in an attempt to cover the focusing errors. 

After several months of shooting static stuff at f5.6 we'll start to wonder why we're carrying around $4,000 disguised as 2 pounds of glass and metal when a less expensive lens might be almost as good so we'll start testing lenses. We'll find that the f1.4 and f1.8 lenses from most cameras companies are really darn good when used at f5.6 and we'll start comparing images from the plastic fantastics to those made with the German Miracle at 200 % in a vain attempt to convince ourselves that there really is $3850 worth of difference between the two. Our egos will gain a respite while we go back and examine the wide open images we made, on a tripod, with the magnified focusing with the Otus lens. We'll comfort ourselves with the obvious evidence that the lens blows away anything from the big camera companies 50mm lenses when also used wide open.

At that juncture we'll grudgingly start listening to what all the other people on the web have been saying about the Sigma Art Series 50mm and we'll try one on a Nikon D810. It will focus perfectly at f1.4. We'll shoot all the stuff we've been shooting on the Otus with the Sigma for a more direct comparison. And then we'll relearn the term: Within the margin of error.

In exhaustion and resignation we will sell our Zeiss Otus to the next starry eyed perfectionist at a great loss and begin the process all over again. Rationalizing our expenditure on the Sigma lens over the camera maker's stuff. But in the end we'll really know what we've known all along: There might be incredible stuff out there but we'll end up dumbing it down because in the end we're lazy enough to believe that "good enough" is good enough. Especially if it doesn't cost us a fortune and actually works for the kind of images we enjoy taking. 

I've owned plenty of Leica M and R 50mm lenses as well as the Zeiss 50mm ZF and many different brands of macro lenses. The Sigma is at least as good and wide open it's more than good enough for me. If you are a fast 50 shooter you should get one. They hit a sweet spot between poverty and performance. 

Order one here and make me rich!


If you have to know that you own the best then step up and buy the Otus. 


Only want to spend $5 or $6? Try the novel instead....


Portrait in three tones.

©2013 Kirk Tuck


I like longer lenses for portraits. An 85mm on APS-C or a 135mm on full frame. It's all personal taste.


I've tried it lots of different ways and I always come back to using longer lenses for the portraits I like. There are always situations, like environmental portraits, where you might want to include more of the background but when shooting in the studio or making portraits for myself nothing beats the extra reach.

www.kirktuck.com

7.23.2015

Just Working. Shooting Portraits out in the mid-morning, Texas Sun. BHS.


Many of my clients like the idea of having portraits of their key executives made outside, in nature. It seems like an easy thing to do unless you want control over the quality of light and control over your backgrounds. This is a quick post about shooting outdoors in the sunlight. 

If clients gave you a blank slate you would probably find a place with ample open shade and a lovely background that was also in open shade. Then you'd have controllable contrast and consistent color in  your images. You would also have comfortable portrait subjects because they wouldn't be looking into bright areas that make people squint. 

Even though I prefer photographing people in my studio I understand the need for many corporations to stage photo sessions either on their premises or close by. My client was looking for nice, saturated greenery in the background, a location one block from their H.Q. and someplace adjacent to air conditioning and restrooms.  We found a location just outside the front door of the LBJ museum in "downtown" Johnson City, Texas.

I had scouted the location previously and had a good idea what a series of portraits, made across the space of four hours might call for, logistically. We'd need a powerful flash to match direct sun falling on the trees in the background. We'd need a large silk panel to cut the direct sunlight as the sun marched up over head and we'd need some black flags to both cut direct light and give the subjects something dark to look at in an attempt to prevent squinting. I also decided to toss in a silver reflector panel to add some fill light to the shadow side of peoples' faces. I knew I would need a medium telephoto focal length in order to get the camera to subject distance we wanted and to render the background sufficiently out of focus. We might as well combine all of that with a high dynamic  range camera in order to help prevent blown highlights on skin and grouchy shadows.

Our first subject was scheduled to be photographed at 7am which meant leaving Austin at 5 a.m. If the trip timed out right I'd have an hour to set up and test before we needed to get rolling. A 5 a.m. departure means that I pack the night before. Easier to navigate my checklist when my brain is still relatively engaged.

I arrived to a dark location right at 6 a.m.  I set up a Fotodiox 508AS LED panel to use as a work light for the area I wanted to work in and proceeded to set up panels and lights.

My basic lighting was this: One medium soft box, powered by an Elinchrom Ranger RX AS power pack on camera right, positioned high enough to cast a shadow under each subject's chin. The box is about 35 degrees to the right of the camera. That's my main light source. Next I put the silver panel to the subject's opposite side (to the left of the camera) to grab some photons from the main light and redirect them into the shadows. So far, so good. 

Once I get this all metered (yes, I still use a meter. It's helpful to know you are in the ballpark before a stand-in is even there to stand in) I start bringing in 4x4 foot flags that are black on one side and white on the other. I want to use one of these panels (with the black side facing the subject) to block any direct light from the sun on the subject. I use a second 4x4 with black facing the subject to give my portrait sitters (standers today....) a place to rest their eyes. This panel goes directly behind the camera. 

I put my panels on C stands and used a 30 lb. sandbag on each light stand. The combined weight of the largest C stand and a sandbag is about 50 lbs. That makes for a good anchor against the kind of light (and welcome) breezes we had this morning. The main light in the softball is on my favorite, heavy duty, Lowell stand and it's also anchored with with big sandbag.


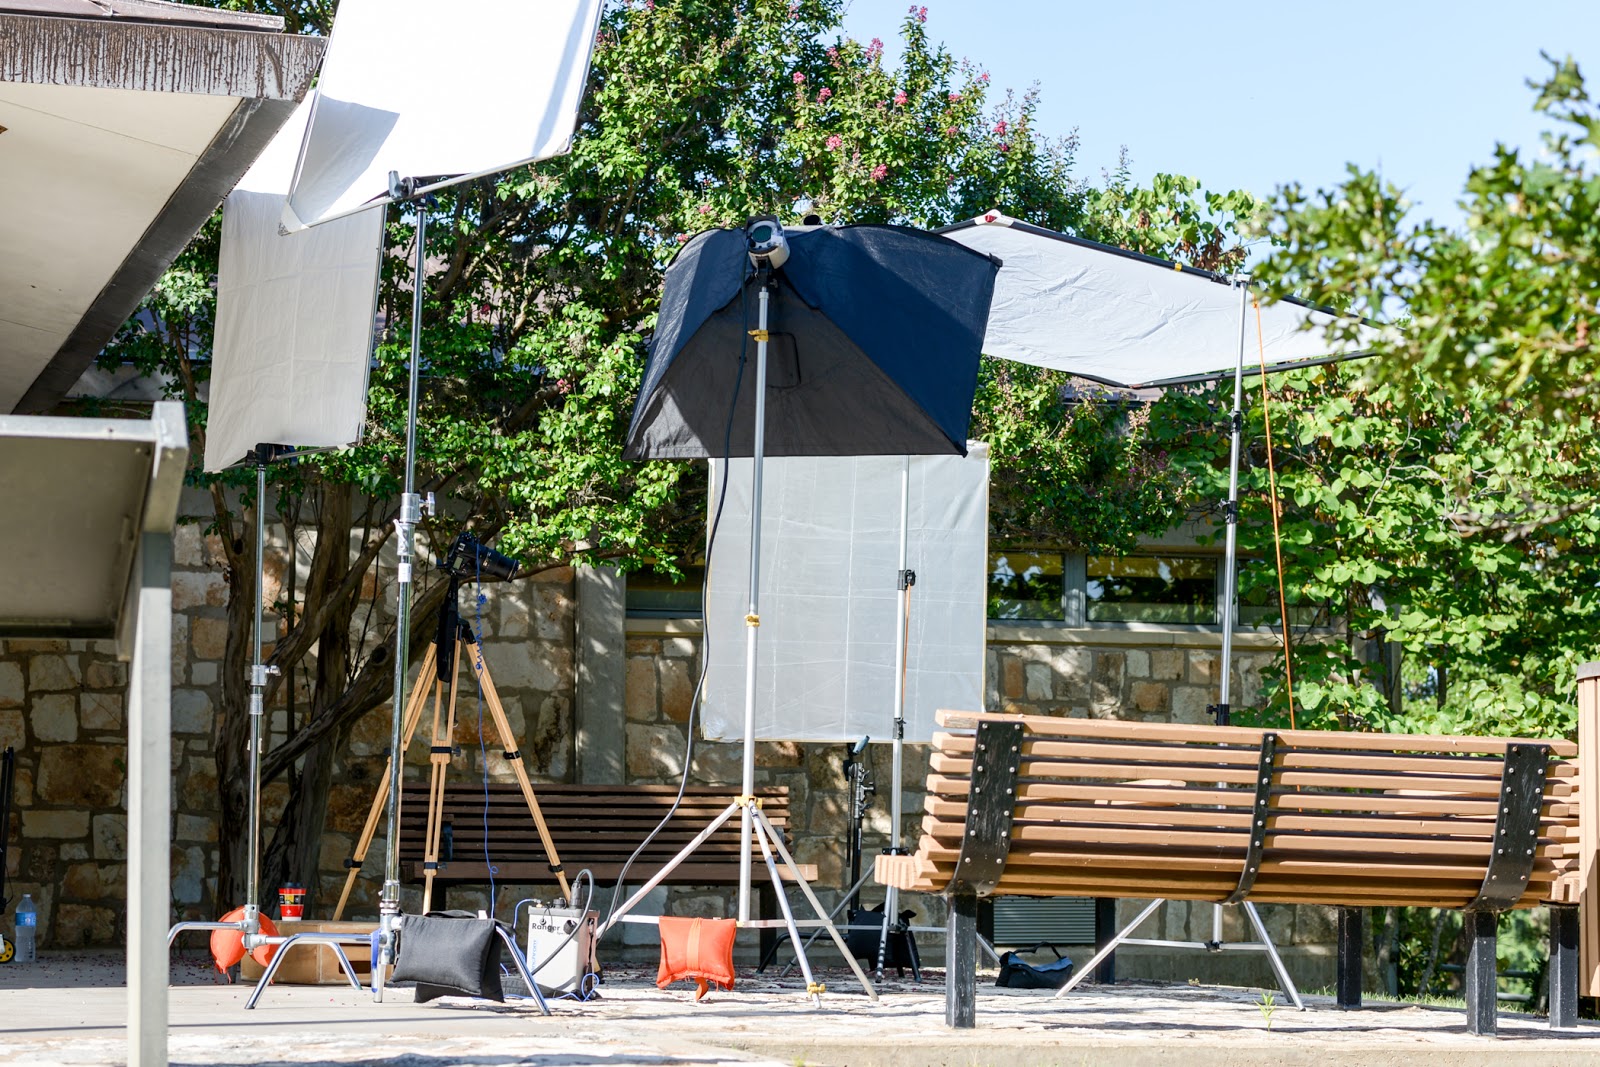
The view from the back/side of our temporary set showing all the components surrounded by benches.

Side view of the set. Note the two flags to the left. The lower one just behind the camera is to set to show black to the subject which helps them keep from squinting. The taller of the two blocks any direct light from the sun onto any part of the scene not covered by the large scrim. The silver fill flag is in the middle at the far side of the set.

The main light is an Elinchrom flash head in the softbox. The head is powered by the Ranger RX AS pack. We shot from 7-11:30, made portraits of ten people, twenty to forty images per person, and the pack power indicators still showed "full power" at the end of the shoot. Five years on with the Elinchrom system and not a single failure! (Hope I didn't jinx myself...).

Note the heavy duty sandbags on all light stands with flags and softbox!


Sandbags draped over tall legs on C-stands are easier to set up, easier to take back down. And C-stands don't cost much more that the shitty light stands you get from the regular sources.

Yes. I own multiple sets of radio triggers. Yes, in spite of that the camera and flash are hardwired. 
Can you say, "Interference free!"?

The soft silver fill panel. The least sexy component on the set. But helpful in its own way. 


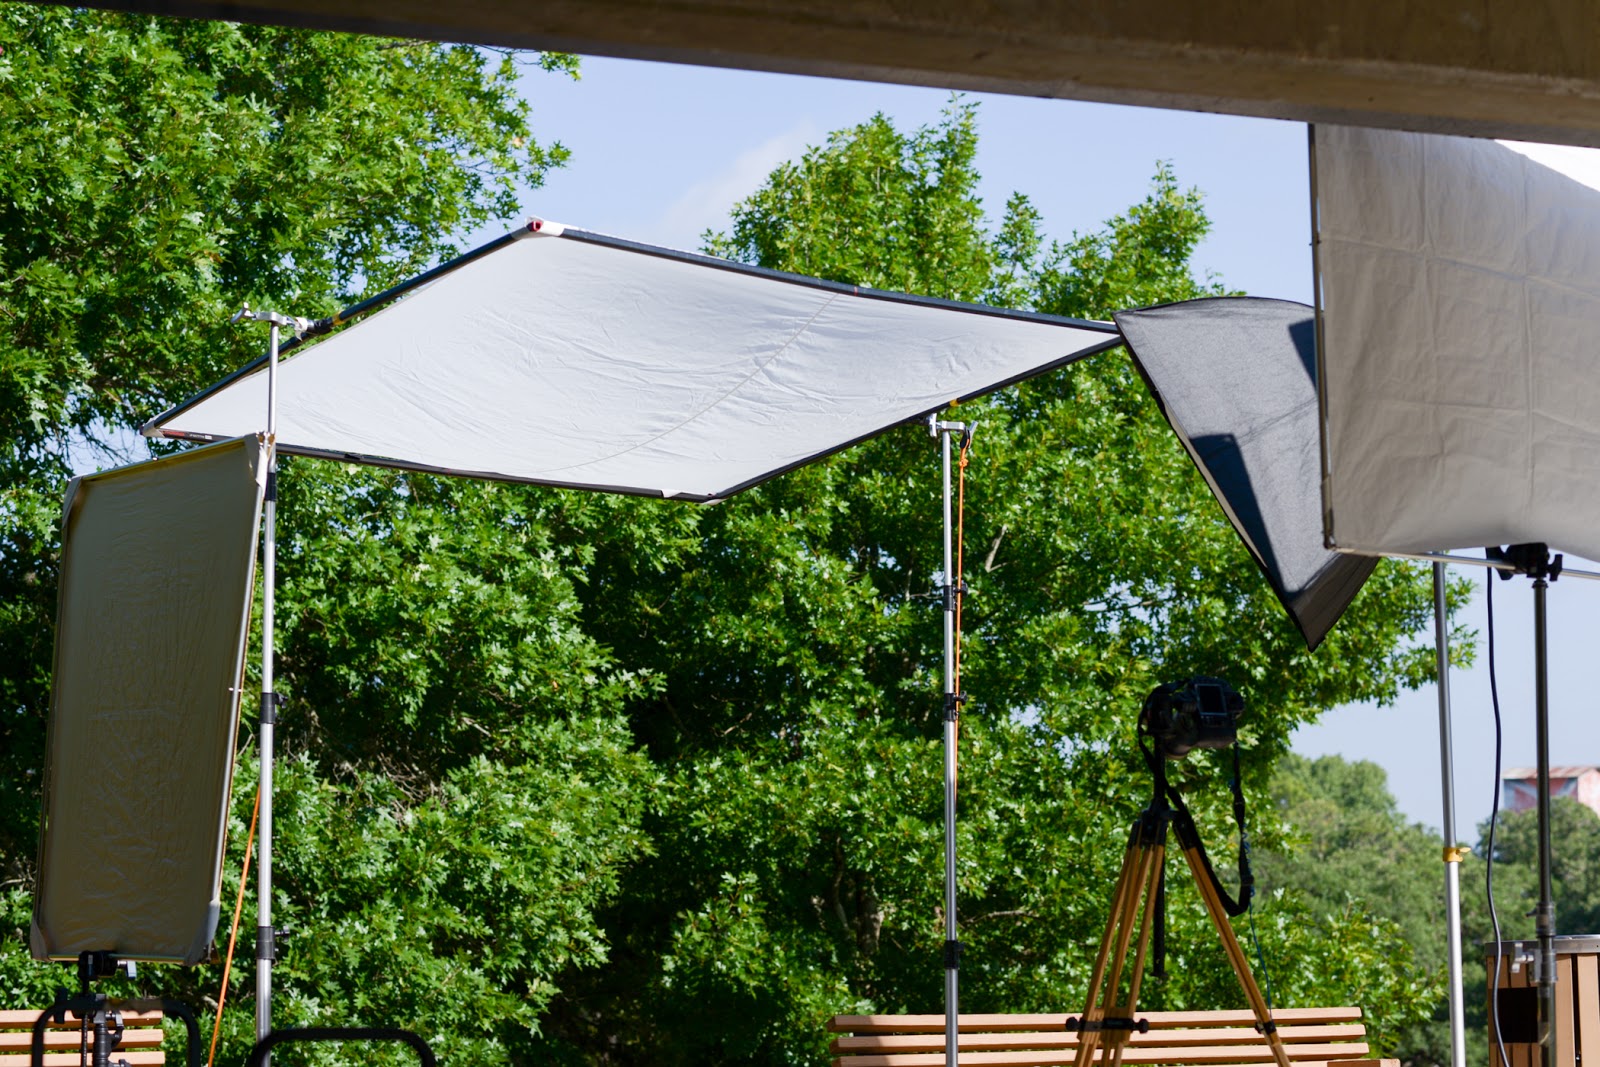
This is a view from the left and back of  the camera position. We didn't need the big scrim first thing in the morning but it sure came in hand for the sessions we did between 10:30 and 11:30 am. The sun was high up and raging. The scrim blocked direct light and provided shade for the portrait subjects. 
The 77 x 77 inch scrim is anchored to the park benches with bungie cords. Before we started shooting I roped the front and back of the frame to the benches as well so it couldn't move even with a stout gust of wind. No sense spending time nurturing a client only to end up clonking them on the head....


The clamps are nice and tight but I like to make sure nothing can slip so the connection to the panel is wrapped in a couple loops of gaffer's tape. Just to be sure...

I like bungie cords because then give a little and then restrain. Nothing held down by bungies ever seems to break. And they disconnect quickly when you are done. 

The nice thing about using super powerful, professional lighting gear instead of hot shoe strobes is the fact that half power still gives you nearly 600 watt seconds per flash but you also get pretty fast (1.5 sec.) recycle times. And if you need short duration flash to freeze fast moving executives you can use a Ranger "A" head for durations like 1/3250th of second. 

It would be difficult, exhausting and time consuming to try and work with 100 pounds of sandbags, multiple stands and frames, heavy duty flashes and more without the trusty cart. It certainly earned its meager pay today.... (Client: Thank you for the water, the coffee and the lunch. All were needed and just right!)

This is a Fotodiox soft box that I bought from Amazon. It was cheap, can be used with 500 watt tungsten lights, sets up quick, seems impervious to unintentional destruction and also puts out a nice quality of light. Less than $100. Used for well over a year. No wear visible.

Once you get wood you'll never go back. I grabbed my black C-stand and quickly let it go. Sitting in the sun heated it up quickly and well. Not so with the aged, white ash, hand made German tripod. Grab a wooden leg and you find the rig to be "temperature neutral" even in blazing sun. I want another one --- just in case they go out of business and stop selling them. They are that good. 

This view is a bit behind where the subjects stand. Just want to show you the collection of flags and reflectors from a different direction. Nice, huh? 


Since we kept following the sun we kept changing configurations to make sure we were able to keep our subjects out of direct sunlight. The images above and below show the final settings for the images taken around 11:00- 11:30 am. 


We photographed ten different people today and tried to get them in and out quickly so they would not wilt in the heat. After the last person trudged back to the office I took everything back down, took the frames and the softbox apart, loaded the cart up with all my stuff and re-packed the car. 

It took about 45 minutes in the early morning to get everything set up and ready for the job and it took about 30 minutes to collapse it all, pack it and stow it for the trip home. 

Once I packed my car the art director and I sauntered off to a well deserved lunch. 

I always laugh when someone suggests we take a "quick" portrait outdoors. There is no substitute for control sometimes. And that requires some stuff. 

Here's an image the client took of me being my own stand in for the lighting:


I should have used the make-up kit.

Below: seen on the way to lunch...


Camera used for project: Nikon D810
files: raw, 12 bit losslessly compressed
lens: Nikon 24-120mm @120mm
ISO 64.


7.22.2015

Showing up ready to shoot means more than just packing the gear.

Calamari for an Austin Hilton Hotel restaurant.

When I accept a project for a client the first thing that the client and I do, together, is to figure out what kind of need they have, how they want to solve it and what they want to end up with when our photographic project is complete. This means that we talk about style, execution and who will be responsible for what and when. 

The assignment that generated this image, along with ten or twelve other food and beverage shots, required a number of pre-planning steps. First of all there is the primary decision: will we rent a studio space with a commercial kitchen and bring in a food stylist or will the client want to shoot at their location and have their chefs and food&beverage managers handle the food preparation and initial styling? There are advantages and disadvantages in either direction. In this situation the client was adamant that we come over to their turf and have their people work with the food.

The next step was a consultation at the location with the art director. He and I walked around the restaurant that the hotel wanted us to use and scouted for a perfect spot. We chose a smaller, private dining room because we'd be able to control the light and we would be able to work even if there were customers in the main dining room. While we were at the location the art director filled me in on the general look and feel that he would like the photographs to have. A lot of that discussion centered around what to do with the background. The white background worked for both of us. I added the white background material to the list of equipment I would need to bring. 

Next up I wanted to talk to the chef who would be spearheading the kitchen on the day we'd be shooting. I wanted to make sure he knew what we needed and what we were trying to accomplish with the food. Both in terms of styling and presentation as well as the timing and process of getting the food out to us while it was fresh and intact. We needed to let the chef know that we wanted a "stand in" dish first so we could figure out the lighting and the angle for presentation, and then, when we had test shots that the art director and the marketing person from the client side were happy with, we would call for the "hero" dish, tweak it, and then shoot quickly to maintain the food's fresh look.

A nightmare situation would have been a chef sending out everything at once and then going on a coffee break. We knew the guys in the kitchen at the Hilton knew better but it's the responsibility of the photographer to assume that no one has ever done this kind of thing before and therefore should be walked through the process to ensure it's all going to work out.

My next step, after confirming the date of the shoot, is to start assembling everything we might need for a successful shoot. That includes not only the cameras, lenses and lights but also things like: chopsticks for carefully arranging/fine-tuning food on the plates, a small atomizer of water to apply condensation beads to cold glasses, shims to angle plates up or down, tweezers, scissors, and toothpicks for propping. We even bring little styrofoam peanuts to fill in the bottom of bowls so salads sit higher.

I usually bring along a sprayer with olive or canola oil to use in a pinch to glisten up some foods, as well as a hand held steamer for not only pulling creases out of tablecloths and napkins but also to steam food with to give dishes a moist, hot feel. 

In the days leading up to the shoot day I spend a lot of time looking through food magazines, like Food and Wine, to get styling ideas and to look at the way food is presented. I also look through a book of food photography I've had for years that was done by Lou Manna. Might as well steal from one of the best....

Another important part of being ready is to pick the right assistant. For a food job at a nice restaurant I'm not looking for a young kid with a blue collar aesthetic and a lot of energy I'm usually looking for an assistant who likes and understands fine dining and who is seasoned enough (yes, I get the pun) to be calm and measured on the set. Not everything needs to happen at the speed of light. I also want someone who is very detail oriented because that's my blind spot. I can see a bit of chaos and rationalize it as "casual" where a more detail sensitive person makes a better decision about how sloppy is too sloppy.

An important part of any shoot that requires the willing participation of third parties is the "call sheet" or agenda for the day of the shoot. This is a standard feature in video and film production and I tend to make it mandatory on days with agencies, clients and collaborators whom I do not directly control. 
The call sheet let's everyone know when they (individually) need to be on the set or bring something to the set. It also provides contact info for everyone so if someone is running late they know who and how to call. 

I like everything in a call list because if we say, "We'll be there at eight!" The client or agency might interpret that to mean, "We'll start shooting the product right at eight!" The call sheet takes out any interpretation. It would say, "Kirk, Assistant and Art Director to arrive on location at 8 am to begin unpacking and setting up. First test dish to be ready from Kitchen at 9 am." A detailed schedule might include times for each dish to be ready. It will also include a stop time. And a packing up time, which should occur within the eight hour shoot day, not as an addition to it. 

There is a tendency of people to charge by the day or the hour but I would like to always charge by the project and by the usage of the project and here's why: If I can schedule the project to be done (portal to portal) in less time, and my schedule is accurate,  I win and the client wins. We know up front what our time commitment and cost will be. If we separate hours from the value of the finished images I am generally rewarded for my experience because I'll be able to do a better job faster. The client gets great images and always gets back valuable time that can be leveraged somewhere else. Ditto for the Art Director. I get paid for my experience and my eye, not how many hours I spend. Charging by the project also keeps clients from "adding in" extra shots and extra work to punish your expertise and experience. By that I mean that if we finish earlier then our day was more efficient for everyone. The client got the value they expected to pay for. Charging by the day means some clients start looking for extra things for you to do if you finish "early."

If we charge solely by time instead of calculating a fee based on usage and the value of the images then we can include the time spent researching images into the value as well as our career history of learning things up to that point. If we charge by the hour we then get into explanations for time that most people who work on salary have a harder time understanding. We are paying you to pack up and load your car? We are paying you to drive over here from your studio? (the unspoken objection: "no one pays me to drive to work every day! Pout!). We are paying you to pack up your stuff and drive back to the studio? We are paying you to unload your car? Changing the conversation from time value to image value allows you to skirt unproductive conversations and objections. 

If you aren't as good as you think you are you might need to stay longer and make less on a per hour basis, following this method, but you'll learn for next time. It's all part of the process and knowing how you'll charge and why is an important part of being ready to shoot. 

Finally, showing up ready means that you need to have the energy and enthusiasm to do everything right for the client and the project at hand. Maybe that means turning down that second glass of wine the night before. Maybe it means getting to bed earlier and getting a reasonable amount of sleep. For a very complex job it may even mean a bit of meditation the day before to calm your mind and open yourself up to alternate ideas. For me, it also means eating a good breakfast with a lot of protein. A long and dependable energy source always beats downing a bear claw with your no fat latté and then having to deal with the sugar crash a few hours into the job.

The most important part of being ready is to have some sort of visual image in your mind of what the final images should look like when you've done the job the way you wanted to do it. Because without the mental map you might just shoot unanchored and get stuff that doesn't match and doesn't fill the parameters that you promised the art director and the final client. A focused mental image of what visual success looks like is the blueprint for successfully bringing the work to fruition. 

Oh yeah, and then there's the gear. But we've talked about that enough.

7.21.2015

Pedernales Falls State Park. Pool with puffy cloud sky.

Converted from color to black and white with DXO FilmPack 3.0.

click to see larger!


Try the novel...add some spice to your Summer vacation.

Using the Nikon D810 as a "Zoom" Camera.

Chanel Haynes-Schwartz at Zach Theatre. 
©2015 Kirk Tuck

I'd love to own every lens in the Nikon catalog (except the crappy kit lenses and weird, DX lenses) and I'd also like to own all of the Sigma Art lenses but, unfortunately, I live in the real world reality of a commercial photographer working in a second tier market. C'est la vie.

If I had all the lenses I want I'd have one of the discontinued Nikon 300mm f2.0 lenses and a full time assistant to carry it around for me. I chose to buy a car instead. We still need those in Texas. We don't need 300mm f2.0s quite as much.

But where it would always come in handy is when shooting dress rehearsals on the new Topfer stage at Zach Theatre. In the two older stages we rarely ever shot dress rehearsals with a full audience and the venues were tiny by comparison. Generally, I got by handily with a fast, medium range zoom and something like a 70-200mm or sometimes even just a 135mm f2.8. Something with enough reach that, from the front row, created a sense of close intimacy.

Ah, how things change. We are now shooting with almost full houses and while I could move about (marketing takes some precedence over "family and friends" non-paying audiences) I think it's too disruptive and too difficult to work around and in front of a packed house in the same way. I've mostly chosen a vantage point that allows me to shoo fully stage shots (side to side) from the middle row, sitting in front of the videographer and just on the aisle row that has space between the front and read of the house.

Now if I want an intimate shot I'm racking my 80-200mm f2.8 all the way out and praying that the actors do fun and interesting stuff near the front of the stage. Lately, I've decided to do what I would have never done with a less resolution intensive camera and I've started using the various crop modes that the D810 offers. I can easily switch between the full frame (200mm) a 1.2X crop (240mm) or the DX crop (300mm). I know that these modes are really just crops of the sensor but they help me visualize (with the finder lines) exactly what I'll end up with and, since I shoot so many images it potentially saves me a ton of time in post production.

This shot is a perfect example of where a high resolution camera, in crop mode, shines. Chanel was near the back of the stage, at least 100 feet from my stationary position and I really wanted to get in tight enough to make the shot interesting. I did a longer, vertical shot of her to show off the dress with the exaggerated train but I felt like the tighter composition would be more engaging. Since I was already at the 200mm setting of my f2.8 zoom it was necessary to start using the "punch in" crops. I used the 1.5X, DX crop and I still had enough resolution to allow the art director to crop even tighter, if she wanted to. When you click on the image above you'll see it at around 2100 pixels wide but the original file is 5520 x 3680 pixels. That's still an amazing amount of resolution to play with, especially for web use.

More amazing to me is the image quality of the files given that they are shot at 1600 ISO and are handheld with neither the camera nor the lens having the benefit of image stabilization. At a 300mm equivalent that's pretty great performance from every part of the chain (including me).

I now pronounce the Nikon D810 the current, ultimate zoom digital camera. Crop to your heart's content and do it in camera so you know what you are getting. Cropping after the fact is just an act of desperation or stubborness...


And, by the way, take a chance and read the novel....


Sometimes you engage the shutter button because you love the light, the tones and the textures you are seeing more than the content of a shot. For me this is a good example...


I also like the ambiguity of it all.

Shot during a dress rehearsal at Zach Theatre.


The Novel

www.kirktuck.com

I love nailing white, on white, on white on stage. Balancing the highlights and the flesh tones makes some images work well. This is with the D810 in the DX crop mode. Still a 20 megapixel image....

©2015 Kirk Tuck for Zach Theatre.

Tip: Manual Exposure. Spot meter for the white coat and then open up 1 and 2/3rd stops. Push up a third of a stop in post.  KT

www.kirktuck.com

The Novel...

Defying Gravity On Stage.


What: A Dance number from "Sophisticated Ladies" 

Where: Zach Theatre at 1510 Toomey Rd. Austin, Texas 78704

Camera: Nikon D810+Nikon 80-200mm f2.8 lens

Particulars: f3.2, 1/1000th of second, ISO 1600, manual exposure, autofocus - center group Jpeg file.


Buy Kirk's Novel!